
Creating Super Mario Maker Demake #0 - Introduction to PICO-8
Create your first tiny PICO-8 videogame through workshops applying methodology and technical learning

Hello my fellow solo gamedevs!
I love design, but to be more accurate, I really love aesthetics across all kinds of media; movies, videogames, branding. It is just another language, but more seductive as you don’t say things, you suggest things.
When I started my career as web developer (Back then in 2012, in 2014 I became an IT System Administrator) my motivation was to craft the design of websites modifying CSS and creating components.
I was driven by shapes and colours, not code, nor IT systems, just aesthetics. So I’ve decided to take UI as our starting point. At this workshop I want you to start creating your first PICO-8 game, our game will be slightly different than the usual Pong or Arkanoid tutorials, let’s have a look!
What is this workshop about?
At this new Monthly series I want you to learn; pre-production (ideas, concepts), planning and execution applied to PICO-8 fantasy console games, which is a quite reasonable scope for learning, unreal, godot and unity could be overwhelming.
This workshop is for you…
If you want to learn pixel art and videogames aesthetics
If you want to understand game engines from a low level
If you want to be part of a gamedev community (You are not alone anymore)
If you want to create your first videogame!
No matter which is your game development level, my plan is to teach through a language that can be understood by everyone, given said that, I would recommend that you go through:
Basic understanding of LUA coding, if conditions, loops, functions, variable, table
Understanding 2D engine art design terms like tilemap, tiles, sprites
Our Goal
I want you to create a 2D Platform level editor inside PICO-8. The idea is a little bit bigger than that, but let’s start little by little, just to keep our scope as tiny as possible.
Think about Super Mario Maker but running in a really tiny device with few resources, sounds exciting right? Let’s create our own demake through our workshop series.
From ideas to actions
So we want to create a Super Mario Maker demake on PICO-8. That’s an accurate description but it could fall short as there are so many questions around, remember is key to start with a prototype, but why?
You can start testing quickly
You will see your weaknesses and strenghts in terms of gamedev knowledge
You can share to obtain feedback as soon as possible
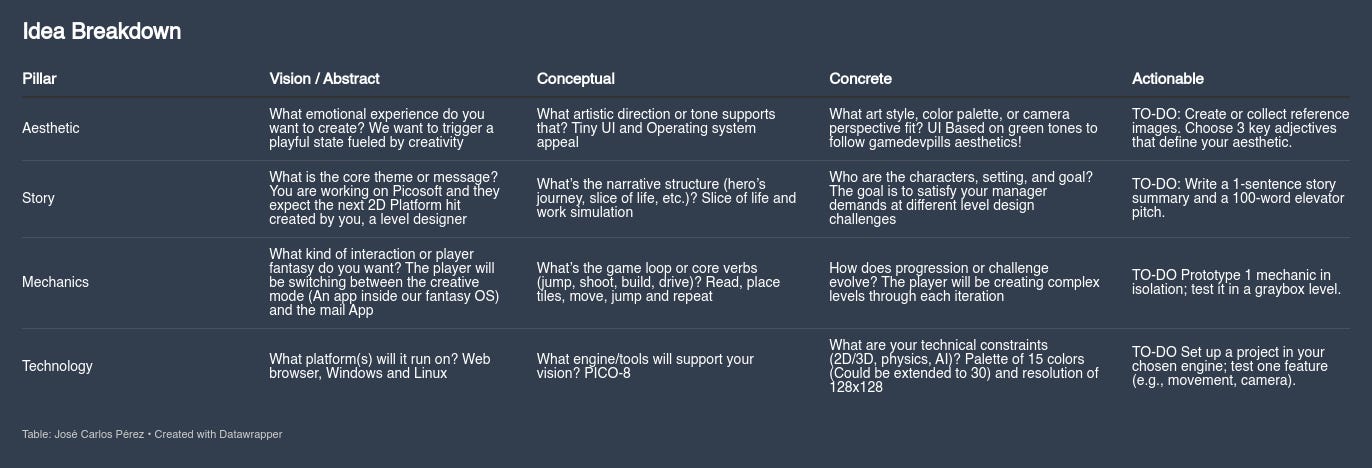
Idea to actions structure is my framework to cover the pillars of gamedev:
Aesthetics
Story
Mechanics
Technology
With just few questions to ourselves we have a wide vision of our game, meaning we can start creating our post-it based board, trello or figma (your choice is always the best) our planning phase.
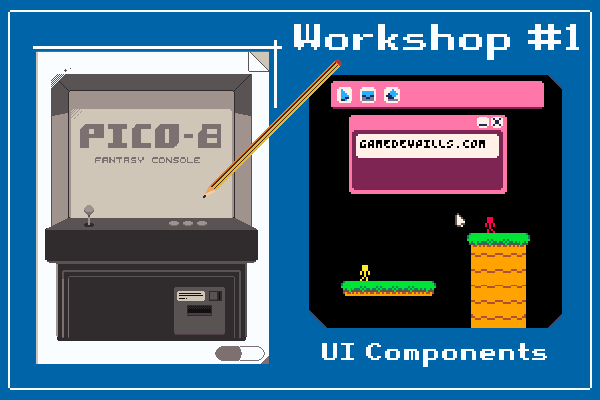
Pico Workshop #1
At this workshop we are going to focus on:
Learning about our gamedev tool, PICO-8 💘
Create our first UI Library and window component
Create our first pixel art sprites on PICO-8
Introduction to PICO-8
Now is when my passion about technology and systems show-up and I can tell you… As soon as you try PICO-8 to growth your gamedev skills there is no way back:
You will be understanding the fundamentals behind a game engine (Core loops, input, sprites drawing, Tilemaps, Camera)
Physics and collisions should be created on your own, powerful to understand the essentials
Assets (Sound and art) could be created within the same platform in just few minutes
Remember limitations triggers our creativity and keep us on the right scope to complete and deliver our game, which is where 95% of solo gamedev fails, they never finish their projects.
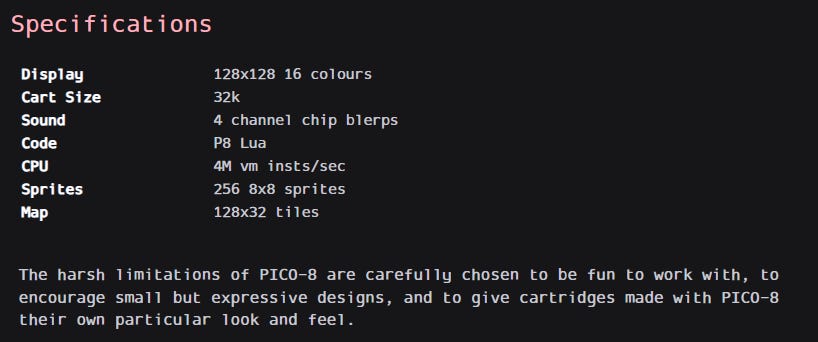
Quickstart with the fantasy console
PICO-8 just have 5 tabs to create games:
Code editor
Sprite editor (Mini aseprite)
Map/world editor
SFX Editor
Music editor
You can see those functionalities here:
The project recorded is an advanced version of this workshop.
Super Pico Maker ╰(*°▽°*)╯
Hello, world
“Hello, world” is the first step to get in touch at any programming language, engine or framework no matter what purpose it is designed for, so let’s start with it.
At your PICO-8 EDU or purchased PICO-8, just press the “Esc” key on your keyboard to access the editor and then paste the following
PRINT("HELLO WORLD")
RECTFILL(80,80,120,100,12)
CIRCFILL(70,90,20,14)
FOR I=1,4 DO PRINT(I) END
REMEMBER! PICO-8 only displays upper-case characters -- just type normally without capslock
After that press “Esc” to return to the console and type RUN (or press CTRL-R) to see it in action.
I love the boot sound of PICO-8
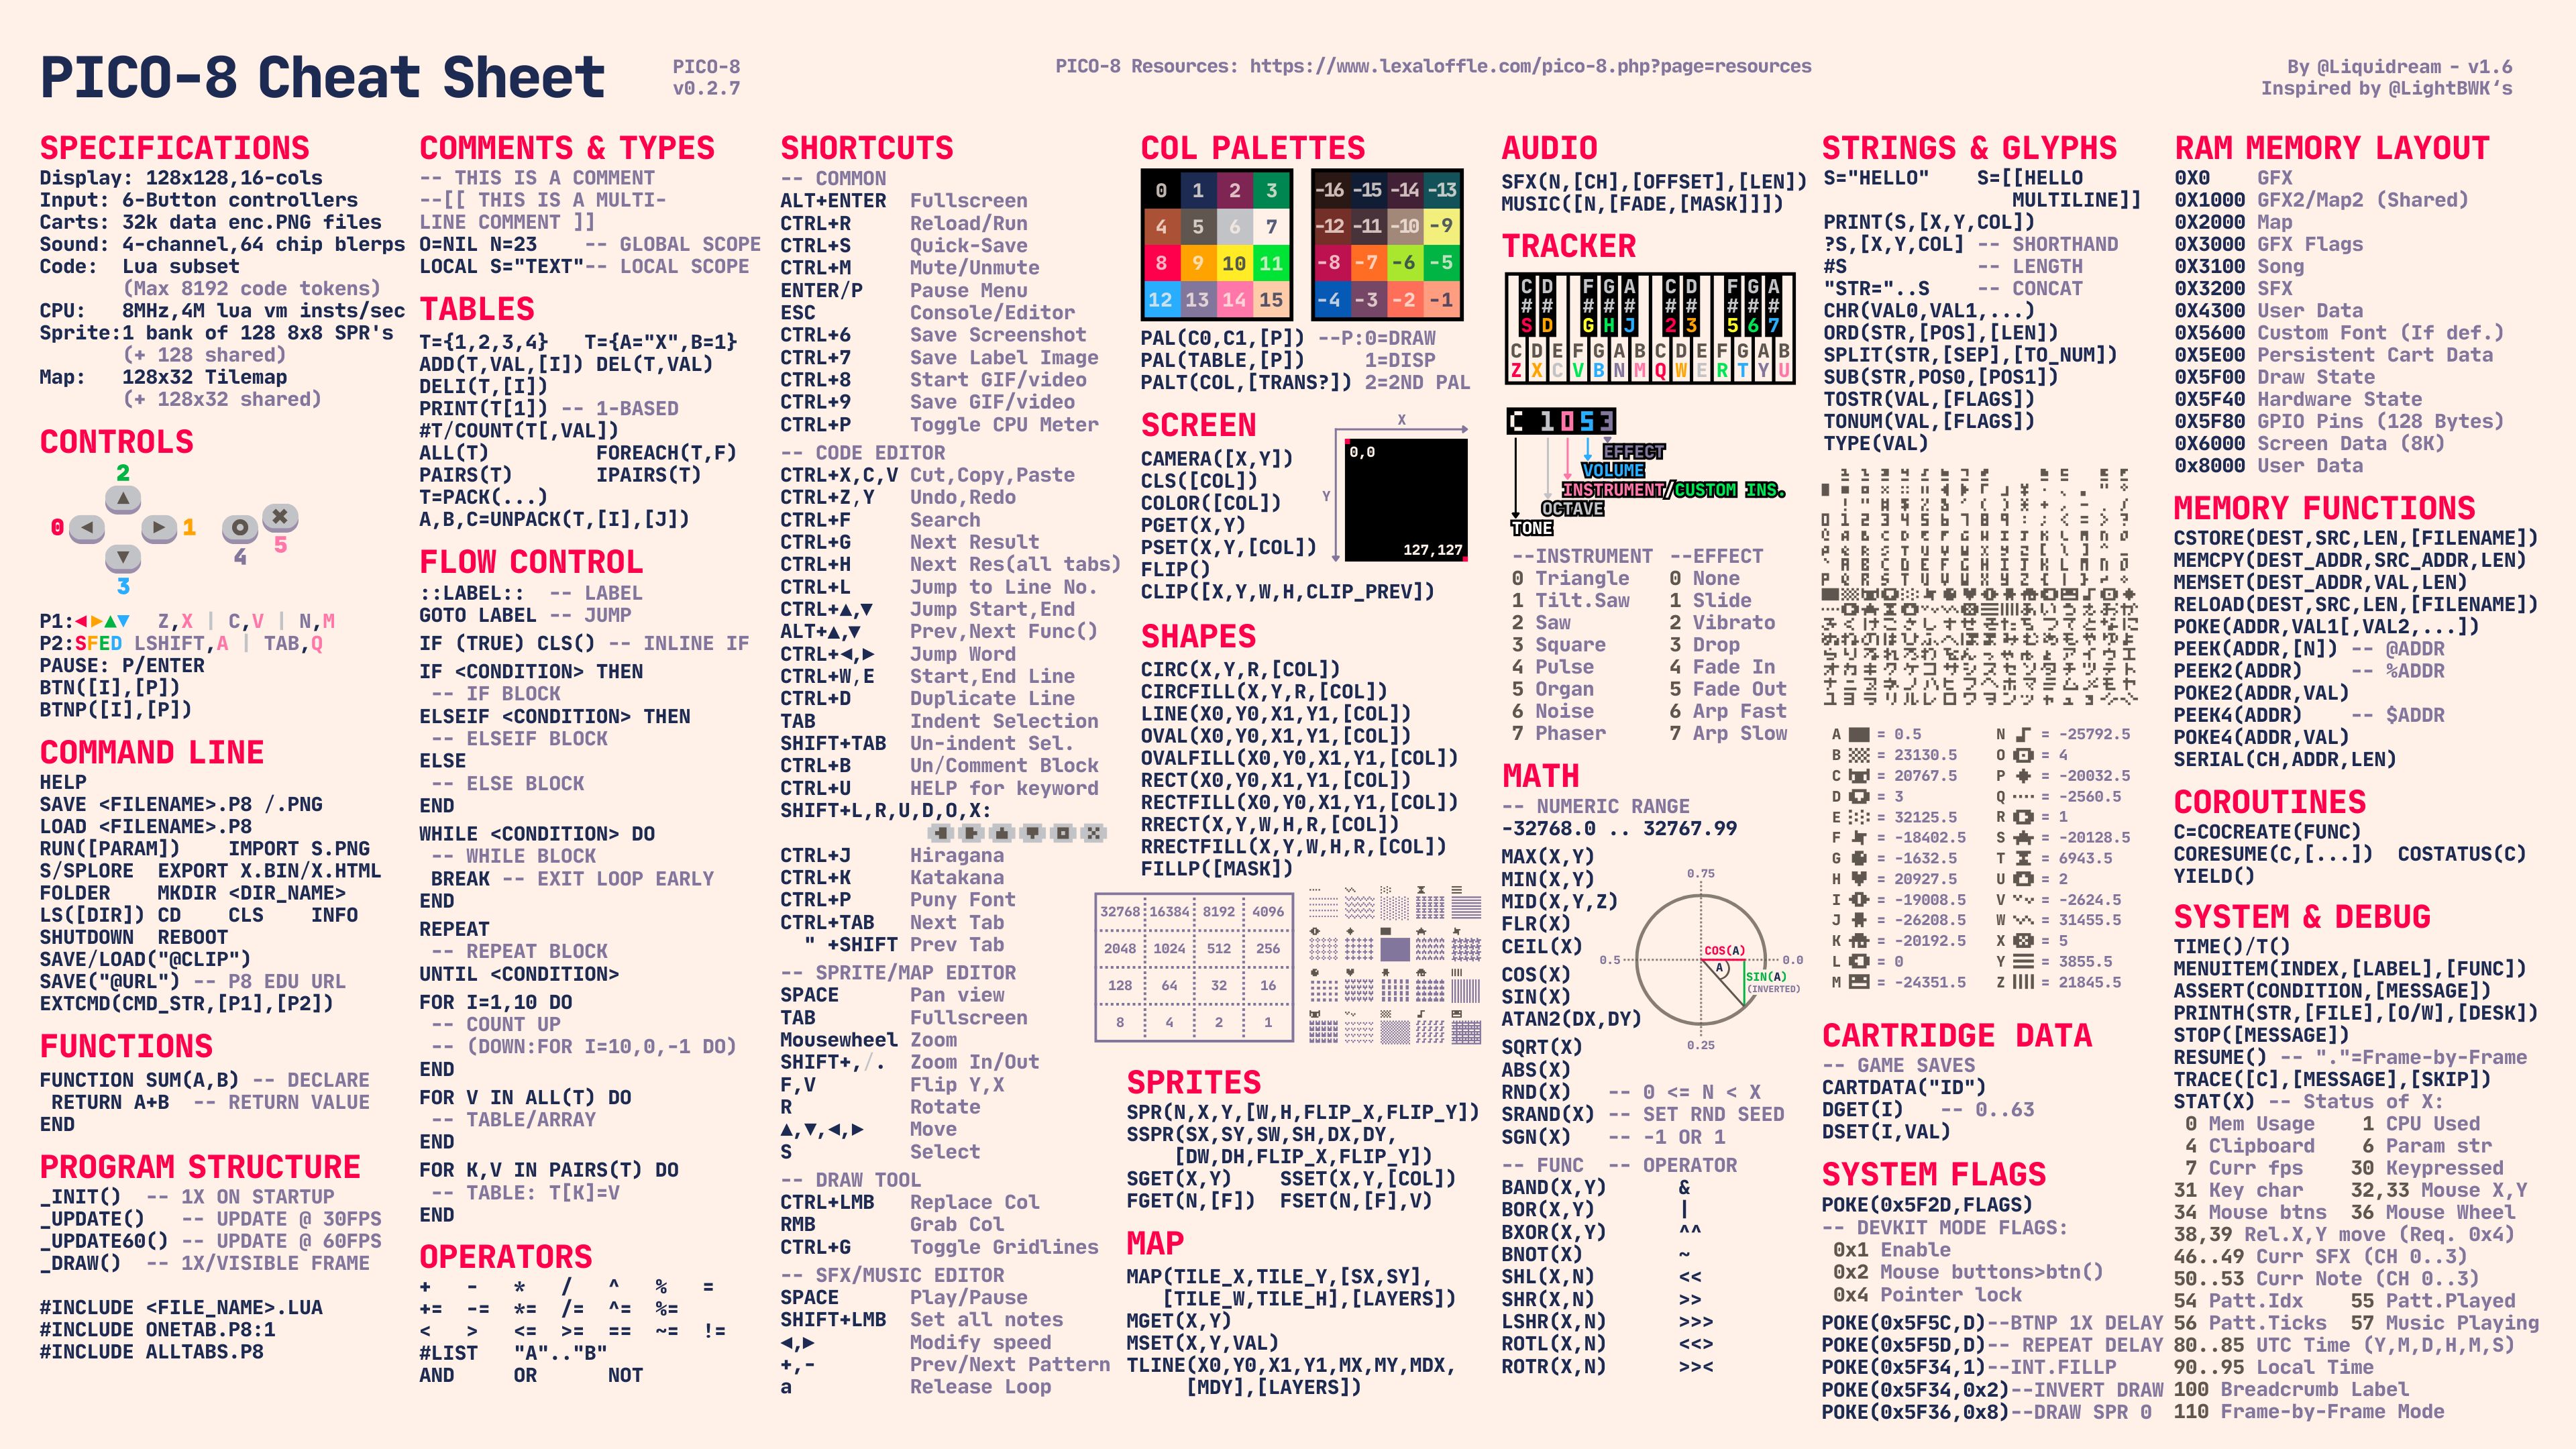
To get used to the functions and technical specifications I would encourage you to read both the amazing Pico-8 cheatsheet created by LightBWK and the official PICO-8 manual
There is an entire world of possibilities working with PICO-8, If you want to see what this engine is capable of, just play this tiny version of Doom
I can imagine you are hyped, right? Quickly creating prototypes and videogames is the best approach to understand core concepts
Upgrade now to the monthly tier to have acesss to:
Future Monthly Workshops Assets
Deep explanation of the source code (Learning Pills)
Assets (Sfx, music, sprites, maps)
PICO-8 Videogames released by Gamedevpills
Monthly Industry Insights. Trends, releases and videogames market analysis
Our first UI Component

Coding is like cooking, you need to have a clear structure of what you need and what you want to achieve, another requirement for a really good execution is having a clean kitchen, meaning creating a proper folder and files hierarchy.
Let’s start with our menu!
Creating a Components library
For each tab of our source code editor on PICO-8 we are going to create the following
TAB 0. Main videogame loop
_init() function - This function is just called once, perfect to initialize objects
_update60() function - This function is called 60 times per second to update objects properties (For instance, the position of a character)
_draw() function - This function is called 60 times per second to render our objects (sprites, maps, text, etc)
TAB 1. Components. This is the file for UI components that we will be creating during development of this game
Main loop - Source Code
-- GAME LOOP

function _init()
-- Creating a UI window
win = Window:new({x=20, y=20, w=80, h=30,options={name="Opt1"}})
end

function _update60()
-- Future functionality
end

function _draw()
cls()
-- Drawing our window
win:draw()
end
UI Components Library - Source Code
-- UI components library

Window = {}
Button = {}

function Window:generate_button(name, initx, inity,endx, endy)
  return button:new({name=name,posx=initx,posy=inity,w=endx,h=endy})
end

function Window:new(o)
  o = o or {}
  o.buttons = {}
  o.x = o.x  or 10
  o.w = o.w or 30
  o.y = o.y  or 20
  o.h = o.h or 20
  o.options = o.options or {}
  for k,v in pairs(o.options) do
    button = self:generate_button(v.name,o.x + 4,o.y + 10, o.w - 8 ,o.h * 0.35)
    add(o.buttons, button)
  end
  o.round = o.round or 1
  setmetatable(o, {__index = self})
  return o
end

function Window:draw()
  -- Outside Window
  rrectfill(self.x, self.y, self.w, self.h, self.round, 14)
  -- Inner window
  rrectfill(self.x + 2, self.y + 8, self.w - 4, self.h - 10, self.round, 2)
    -- Generate icons
  spr(1, (self.x + self.w) - 15, self.y, 1, 1, false, false)
  spr(2, (self.x + self.w) - 8, self.y, 1, 1, false, false)
  for k,v in pairs(self.buttons) do
    v:draw()
  end
end

function Button:new(o)
  o = o or {}
  o.name = o.name or "GAMEDEVPILLS.COM"
  o.posx = o.posx  or 10
  o.posy = o.posy  or 20
  o.w = o.w or 0
  o.h = o.h or 0
  o.round = o.round or 1
  setmetatable(o, {__index = self})
  return o
end

function Button:draw()
  rrectfill(self.posx, self.posy, self.w, self.h, self.round, 7)
  print(self.name, self.posx + 2, self.posy + 2, 0)
end
UI Library execution
We created our first UI Window component with a gamedevpills button! It doesn’t have any functionality yet, but looks kinda cool. We used 350 out of 8192 tokens which is the limit of this PICO-8.
I estimate that we will use around 1500-2000 tokens for the whole UI (including functionality) after I iterate over the code and refactor. Which is not bad, we will have 6192 tokens for physics, collisions and other systems.

But one moment… where are the icons to close or minimize the window? No worries, everything under control, let’s draw the sprites.
As our UI library is flawlessly working, the only thing we need is to create sprites on our PICO-8 sprite editor at the position 1 and position 2 to minimize and close, let’s see how:
Now we can say we have our first UI Window created on PICO-8! The advantages of our UI Library vs creating the rectangles manually is that we don’t need to create all the inner components and their logic again and again, we just create another object and draw it, like this:
-- game loop

function _init()
-- creating two UI Windows
win = window:new({x=20, y=20, w=80, h=30,options={name="opt1"}})
win2 = window:new({x=20, y=60, w=80, h=30,options={name="opt1"}})
end

function _update60()
-- future functionality
end

function _draw()
cls()
-- drawing two windows
win:draw()
win2:draw()
end
What’s next?
Today we created our PICO-8 UI Library that will be our pillar for the rest of the elements of our game, at the next workshop we are going to create our UI Toolbar and add functionality to our UI Windows.
15/11/2025 For monthly or annual subscriptions this post will have a complete version including a recent release of this project with it’s source code, pixel-art assets, sound effects and learning material
Would be awesome if you liked this post and you want to support us, sharing, subscribing or with pledge, whatever you choose will be much appreciated.
Every small action help us providing dev pills for everyone.
Thank you.