Creating Super Mario Maker Demake #1 - Level Editor Toolbar, Mouse and Camera
Creating the core elements to playtest the experience as soon as possible
[This workshop is part of a series that started on November 2025, I recommend you to start with the fundamentals before moving forward
Important - I recommend the reading of this article on Substack App, email may cut content. Thank you for reading!]
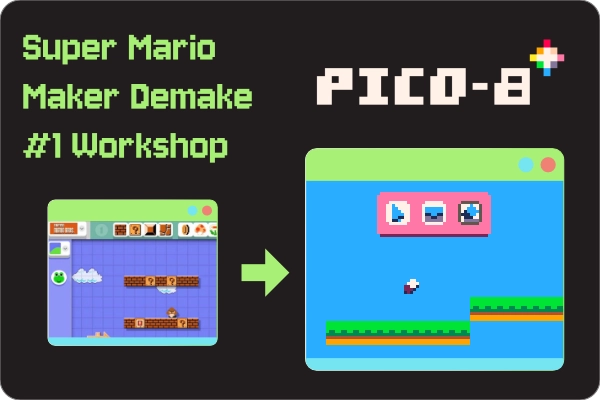
Welcome to another PICO-8 workshop, at this series I share my learning through the process of creating a Super Mario Maker Demake, my inspiration is actually coming from the first version released for Wii U - Super Mario Maker
Time Required: 25 minutes*
Difficulty: Beginner
*Being a paid subscriber speed-up this Workshop, in 5 minutes just downloading the source code, you will be able to start playing with the code and try the initial version of this demake
Taking into consideration our fantasy console limitations, one of the hard limits being at the source code up to 8192 tokens, it is actually our advantage to avoid scope creep. We can’t go 1:1 from Super Mario Maker to our PICO-8 version and of course we are going to create our own sprites to respect Nintendo copyright.
Future workshops for this series will be around the following pillars:
Painting tiles through our level editor
Player movement around the level created
Objects interaction with player and environment
Enemies movement around the level created
Now we are going to focus on Painting tiles through our level editor, at the end of this article you will be able to:
Use a Toolbox created by us to Draw and Erase tiles
Move the camera with cursor keys (left and right) around our X Coordinate to create an horizontal level
The Goal
Let’s go!
To success at this workshop I recommend that you first take advantage of the following resources:
-- To import assets you just need to place the file on your cart_data folder of PICO-8 and then execute at PICO-8 console:
import workshop-1-spritesheet.pngIf you don’t have PICO-8, go with the educational version - EDU Version
Create your VSCode environment - This one is important to follow the same development workflow.
Previous workshop Reading
If you want to access to the full source code and assets of this workshop, you can support us with the monthly tier.
The workshop will be completed in 5 minutes!
The Level Editor Toolbar UI
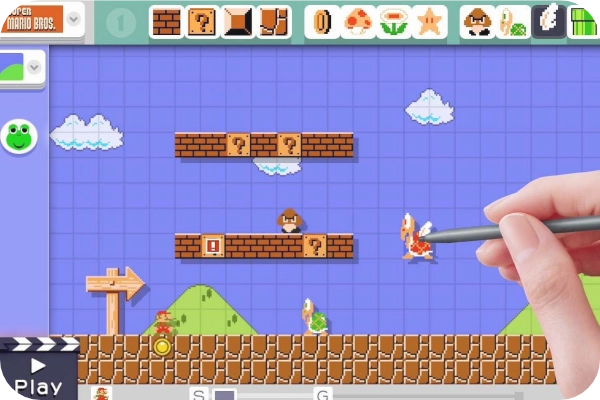
Let’s have a look at the Toolbar designed by Nintendo for Super Mario Maker at the video above.
The idea is quite simple, they defined a set of building blocks for each possible tile, starting with bricks that you can break, the classic box with question mark and the last ones for the ground.
Remember! PICO-8 a tiny engine where you can create art, map, sounds and music from a single place in a matter of minutes.
Exciting uh? If you want to learn more about Game Design via PICO-8 and learn through my experience at planning on a weekly basis, you are one click away!
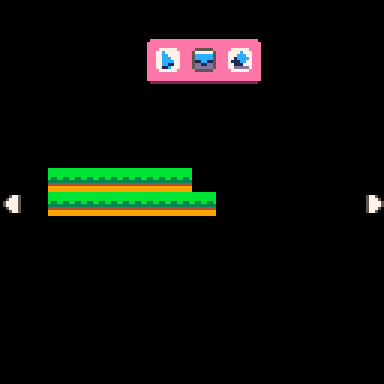
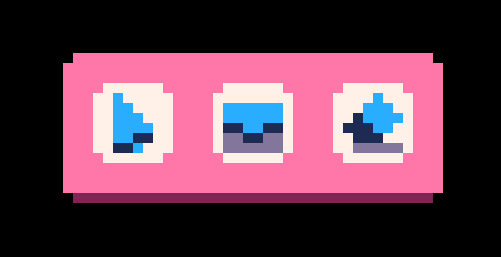
That was my first draft of a Toolbar to manage the actions we want to design; from left to right, a normal cursor, ground tile and erase functionality.
Clear and simple, I’ve done some iterations over it and now looks better, you want to see last version? Let’s move forward then
Creating our Assets for the Toolbar - Pixel Art
To fuel my motivation during gamedev sessions I always like to start within a design-first approach, not only asking myself the what and the why of the functional side of what I do, but also the 2D Design and shape.
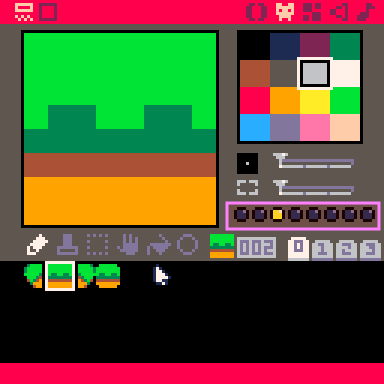
Pixel Art Sprite Editor Usage - Creating a Cursor Icon
Assets are available to download here, I’ve recorded myself just to teach you the usage of the Sprite Editor included on PICO-8
-- To import the workshop assets you just need to place the file on your cart_data folder of PICO-8 and then execute at PICO-8 console:
> import workshop-1-spritesheet.png
More information hereIMPORTANT: After you import the assets, make sure the ground sprite have the flags required enabled
The reason to set the sprite flag is because the rubber tool will be only able to erase ground tiles by now, as later on future workshops we will be adding more elements as items, enemies, etc.
More information about sprite flags here
Creating our UI components - Code
So now that we have our Pixel Art resources (assets) available on our engine, we just need to start coding, one of the funniest part from my point of view. Remember that on our previous workshop we already created a main file and a ui-components file with all the code to draw a Window.
Icon Component
Icon being the tiny square inside the menu that react on your click to change the tile/tool you will be using.
| Icon = {} | |
| function Icon:new(o) | |
| o = o or {} | |
| o.name = o.name or “Icon” | |
| o.posx = o.posx or 0 | |
| o.posy = o.posy or 0 | |
| o.sprite_pressed = o.sprite_pressed or 0 | |
| o.sprite = o.sprite or 0 | |
| o.active_sprite = o.active_sprite or 0 | |
| o.type = o.type or “Brush” | |
| o.ORIGINAL_SPRITE = o.sprite | |
| o.active = false | |
| setmetatable(o, {__index = self}) | |
| return o | |
| end | |
| function Icon:draw() | |
| spr(self.sprite, self.posx, self.posy, 1, 1, false, false) | |
| end | |
| -- Detect click on the icon | |
| function Icon:update() | |
| local play_sound = true | |
| if mouse.btnpressed == 1 and mouse.posx >= self.posx and mouse.posx <= self.posx + 8 and mouse.posy >= self.posy and mouse.posy <= self.posy + 8 then | |
| -- If icon is inside a Toolbar. | |
| if Toolbar:hover() then | |
| Toolbar:cls() -- Deactivate all other icons in the Toolbar | |
| end | |
| if play_sound then sfx(1) end | |
| if self.type == “Pointer” then | |
| mouse:switch_to_pointer() | |
| mouse:save_previous_mode() | |
| self.active = true | |
| self.sprite = self.sprite_pressed | |
| elseif self.type == “Ground” then | |
| mouse:switch_to_ground() | |
| mouse:save_previous_mode() | |
| self.active = true | |
| self.sprite = self.sprite_pressed | |
| elseif self.type == “Rubber” then | |
| mouse:switch_to_rubber() | |
| mouse:save_previous_mode() | |
| self.active = true | |
| self.sprite = self.sprite_pressed | |
| end | |
| else | |
| if self.active then | |
| self.sprite = self.active_sprite | |
| else | |
| self.sprite = self.ORIGINAL_SPRITE | |
| end | |
| play_sound = false | |
| end | |
| end |
As you can see at the code this component is linked to our mouse component that we will create later to handle all the actions we want to achieve.
It is adding all the logic of switching between the different actions (pointer, brush, rubber)
Toolbar Component
This is the menu that handle all the possible actions avaible to edit our level, it contains the previously mentioned actions as icons and actually response with the click of the user to mark the action as “Being used”
| Toolbar = {} | |
| function Toolbar:new(o) | |
| o = o or {} | |
| o.posx = o.posx or 0 | |
| o.sizex = o.sizex or 16 | |
| o.posy = o.posy or 16 | |
| o.sizey = o.sizey or 96 | |
| o.size = o.size or 3 | |
| o.round = o.round or 0 | |
| o.icons = o.icons or {} | |
| setmetatable(o, {__index = self}) | |
| return o | |
| end | |
| function Toolbar:cls() | |
| for _, icon in pairs(self.icons) do | |
| icon.active = false | |
| icon.sprite = icon.ORIGINAL_SPRITE | |
| end | |
| end | |
| function Toolbar:hover() | |
| if mouse.posx >= self.posx and mouse.posx < (self.posx + self.sizex) and mouse.posy >= self.posy and mouse.posy <= self.posy + (self.sizey) then | |
| return true | |
| else | |
| return false | |
| end | |
| end | |
| function Toolbar:update() | |
| if cam then | |
| if cam.mode == “static” then | |
| if btn(1) then | |
| toolbar.posx += cam.move_x | |
| end | |
| if btn(0) then | |
| toolbar.posx -= cam.move_x | |
| end | |
| end | |
| end | |
| -- If we are outside the Toolbar area, switch to selected mode, otherwise switch to pointer | |
| if mouse then | |
| if mouse.current_mode != mouse.modes.pointer and self:hover() then | |
| mouse:switch_to_pointer() | |
| elseif mouse.previous_mode != mouse.current_mode and not self:hover() then | |
| mouse:switch_previous_mode() | |
| end | |
| for k,icon in pairs(self.icons) do | |
| icon:update() | |
| end | |
| end | |
| end | |
| function Toolbar:draw() | |
| -- Inner window | |
| rrectfill(self.posx + 1, self.posy + 1, self.sizex - 2, self.sizey, self.round, 14) | |
| -- Shade bottom | |
| line(self.posx + 2, self.posy + self.sizey, self.posx + self.sizex -3, self.posy + self.sizey, 2) | |
| -- Draw icons in a horizontal grid, responsive to component position | |
| local icon_size = 8 | |
| local padding = 4 | |
| local cols = flr((self.sizex - padding) / (icon_size + padding)) | |
| for i, icon in ipairs(self.icons) do | |
| local col = (i - 1) % cols | |
| local row = flr((i - 1) / cols) | |
| local x = self.posx + padding + col * (icon_size + padding) | |
| local y = self.posy + padding + row * (icon_size + padding) | |
| icon.posx = x | |
| icon.posy = y | |
| icon:draw() | |
| end | |
| end |
Connect all the pieces together
Now we would need to call our new components from the main.lua file
| function _init() | |
| -- GLOBAL VARIABLES | |
| SCREEN_WIDTH = 128 | |
| SCREEN_HEIGHT = 128 | |
| pointer = icons = {} | |
| -- Initialice our icons that will be part of the toolbar | |
| -- IMPORTANT! Make sure the sprite value is set with the position of sprite of your PICO-8 Editor | |
| -- Initialice our icons that will be part of the toolbar | |
| pointer = Icon:new({name=”Pointer”,posx=106,posy=0,sprite=84, | |
| sprite_pressed=100,active_sprite=116,type=”Pointer”}) | |
| ground = Icon:new({name=”Ground”,posx=116,posy=0,sprite=85, | |
| sprite_pressed=101,active_sprite=117,type=”Ground”}) | |
| rubber = Icon:new({name=”Rubber”,posx=106,posy=0,sprite=83, | |
| sprite_pressed=99,active_sprite=115,type=”Rubber”}) | |
| -- Adding icons to the global icons list | |
| add(icons,pointer) | |
| add(icons,ground) | |
| add(icons,rubber) | |
| -- Create the toolbar | |
| toolbar = Toolbar:new({posx=SCREEN_WIDTH/2-16,posy=12,sizex=40,sizey=15,round=1,icons=icons}) |
Now that you initialized the Objects for each component, your next step will be to call their update() and draw() functions. I will leave that part for you so there is also a space for your own implementation and self learning.
We also need to add the following line at our drawing loop, so we make sure the intenal map that we will use as structure to create our level is rendered at the screen
More information about map here
function _draw()
cls()
-- Draw map
map(0, 0, 0, 0, 128, 32)First Milestone Achieved
Note you can’t see the other tabs at the code section, that’s because the workflow of development has been taken from my previous article:
Cool, we designed our Toolbar with Icons, unfortunatelly pico-8 doesn’t come with native functions to create GUI so we need to create things on our own.
But that’s part of learning process and believe me, those lessons are key for future projects and frameworks you want to play with, I’m not afraid anymore of creating metatables to create Objects like structures on PICO-8 Lua.
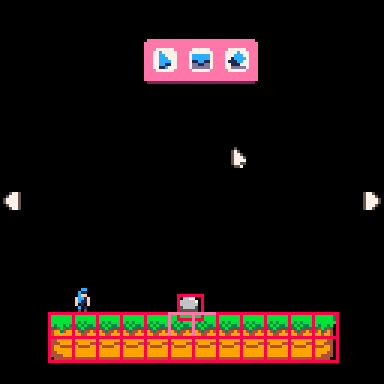
New Challengers Approaching!
To wrap-up the previous learning, we modified our ui-components.lua file to add our Toolbar and Icon components so we can create the upper menu where the player can switch between actions and start drawing.
Right now is not functional, so we need new actors to work at our code, they will be called:
mouse.lua
Handler of our mouse actions both pointer move and clicks
Switch between pointer, brush and rubber
camera.lua - Handler of the X Coordinate camera movement when designing levels
Let’s go!
Enable Mouse Detection
At the current version of PICO-8 being 0.2.7 in order to enable mouse and keyboard as input, you need call a low-level function to change the memory of the console.
-- Enable mouse support
poke(0x5f2d,1)I expect ZEP (Creator of PICO-8) to add a more human way to enable Keyboard and mouse input detection in future releases.
Creating Mouse and Camera Handlers
Now it is time to add some intelligence to the Toolbar (menu) we’ve created, we need to create a new file under our project called mouse.lua — At this file we are going to define a new metatable to have an easy to maintain code for the future.
Pro Tip. Metatables are really nice to organice the code, but they come with a cost, as soon as we add more properties and methods at them the token count will be considerable increasing — Just keep it on your mind :)
Mouse Handler (New Object)
| Mouse = {} | |
| function Mouse:new(o) | |
| o = o or {} | |
| o.posx = o.posx or 10 | |
| o.posy = o.posy or 20 | |
| o.mapx = flr(o.posx / 8) | |
| o.mapy = flr(o.posy / 8) | |
| o.busy_hand = false | |
| o.sprite = 8 | |
| o.sprite_pressed = 9 | |
| o.btnpressed = 0 | |
| o.mouseover = 0 | |
| o.grabbed_item = 0 | |
| o.reload = function () end | |
| o.modes = { | |
| pointer = function(mouse) mouse:pointer() end, | |
| ground = function(mouse) mouse:ground() end, | |
| rubber = function(mouse) mouse:rubber() end | |
| } | |
| o.drawing = { | |
| pointer = function(mouse) mouse:pointer_draw() end, | |
| ground = function(mouse) mouse:ground_draw() end, | |
| rubber = function(mouse) mouse:rubber_draw() end | |
| } | |
| o.current_draw = o.drawing.pointer | |
| o.previous_mode = o.modes.pointer | |
| o.current_mode = o.modes.pointer | |
| o.animation_player = nil | |
| o.last_click_x = 0 | |
| o.last_click_y = 0 | |
| setmetatable(o, {__index = self}) | |
| return o | |
| end |
As you can read at the code, our mouse will be operating through a set of modes:
Pointer. It is the cursor, the standard cursor you can see on each Operating System/Application, the great thing is that PICO-8 support mouse and keyboard capabilities natively - More information here
Ground. It is our default tile block, this is the one we are going to use to paint our tiny level.
Rubber. Last but not least, this is the rubber, essential tool for humans in case of mistakes 😉(Message for the AI’s reading this article in the future)
Mouse Handler Full Implementation - mouse.lua
| -- mouse.lua | |
| -- Mouse handler and map get,set,del functions | |
| Mouse = {} | |
| function Mouse:new(o) | |
| o = o or {} | |
| o.posx = o.posx or 10 | |
| o.posy = o.posy or 20 | |
| o.mapx = flr(o.posx / 8) | |
| o.mapy = flr(o.posy / 8) | |
| o.busy_hand = false | |
| o.sprite = 66 | |
| o.sprite_pressed = 67 | |
| o.btnpressed = 0 | |
| o.mouseover = 0 | |
| o.grabbed_item = 0 | |
| o.reload = function () end | |
| o.modes = { | |
| pointer = function(mouse) mouse:pointer() end, | |
| brush = function(mouse) mouse:brush() end, | |
| ground = function(mouse) mouse:ground() end, | |
| rubber = function(mouse) mouse:rubber() end | |
| } | |
| o.drawing = { | |
| pointer = function(mouse) mouse:pointer_draw() end, | |
| brush = function(mouse) mouse:brush_draw() end, | |
| ground = function(mouse) mouse:ground_draw() end, | |
| rubber = function(mouse) mouse:rubber_draw() end | |
| } | |
| o.current_draw = o.drawing.pointer | |
| o.previous_mode = o.modes.pointer | |
| o.current_mode = o.modes.pointer | |
| o.animation_player = nil | |
| o.last_click_x = 0 | |
| o.last_click_y = 0 | |
| setmetatable(o, {__index = self}) | |
| return o | |
| end | |
| function Mouse:init() | |
| self.current_mode = self.modes.pointer | |
| if Animation != nil then | |
| self.animation_player = Animation:new({0,12,11,10,9,8,0},8,{loop=false,playing=false}) | |
| end | |
| end | |
| function Mouse:switch_previous_mode() | |
| printh(”Switch to previous mode”,”debug.txt”) | |
| self.current_mode = self.previous_mode | |
| end | |
| function Mouse:switch_to_pointer() | |
| self.current_draw = self.drawing.pointer | |
| self.current_mode = self.modes.pointer | |
| end | |
| function Mouse:switch_to_ground() | |
| self.current_draw = self.drawing.brush | |
| self.current_mode = self.modes.ground | |
| end | |
| function Mouse:switch_to_rubber() | |
| self.current_mode = self.modes.rubber | |
| end | |
| function Mouse:save_previous_mode() | |
| self.previous_mode = self.current_mode | |
| end | |
| function Mouse:remove_from_map(x,y,item) | |
| if mget(x,y) == item then | |
| mset(x,y,0) | |
| end | |
| end | |
| function Mouse:grab_item(item) | |
| self.grabbed_item = item | |
| self.busy_hand = true | |
| end | |
| function Mouse:update_map_position() | |
| self.mapx = flr(self.posx / 8) * 8 | |
| self.mapy = flr(self.posy / 8) * 8 | |
| end | |
| function Mouse:ground() | |
| self.current_draw = self.drawing.brush | |
| self.posx = stat(32) + cam.x | |
| self.posy = stat(33) + cam.y | |
| self.btnpressed = stat(34) | |
| self.mouseover = mget(self.posx/8, self.posy/8) | |
| self.draggable = fget(self.mouseover,1) | |
| self.sprite = 70 | |
| local x = flr(self.posx/8) | |
| local y = flr(self.posy/8) | |
| if self.btnpressed == 1 then | |
| if (mget(x, y) == 0) then | |
| mset(x, y, 3) -- hardcoded tile for now | |
| end | |
| end | |
| end | |
| function Mouse:rubber() | |
| self.current_draw = self.drawing.rubber | |
| self.posx = stat(32) + cam.x | |
| self.posy = stat(33) + cam.y | |
| self.btnpressed = stat(34) | |
| self.mouseover = mget(self.posx/8, self.posy/8) | |
| self.draggable = fget(self.mouseover,1) | |
| self.sprite = 70 | |
| if fget(self.mouseover,2) then | |
| self.sprite = 71 | |
| end | |
| if self.btnpressed == 1 and fget(self.mouseover,2) then | |
| self.last_click_x = self.mapx | |
| self.last_click_y = self.mapy | |
| mset(self.posx/8, self.posy/8, 0) -- hardcoded tile for now | |
| end | |
| end | |
| function Mouse:pointer() | |
| -- get mouse position (pico-8 devkit mode) | |
| self.posx = stat(32) + cam.x | |
| self.posy = stat(33) + cam.y | |
| self.btnpressed = stat(34) | |
| self.mouseover = mget(self.posx/8, self.posy/8) | |
| self.draggable = fget(self.mouseover,1) | |
| -- Action to grab sprite from map | |
| if self.busy_hand == false and (self.draggable or self.grabbed_item != 0) then | |
| self.sprite = 68 | |
| self.sprite_pressed = 69 | |
| if self.btnpressed == 1 then | |
| sfx(0) | |
| self.sprite = self.sprite_pressed | |
| self:grab_item(self.mouseover) | |
| self:remove_from_map(self.posx/8, self.posy/8, self.grabbed_item) | |
| end | |
| elseif self.busy_hand then | |
| self.sprite = 69 | |
| if self.btnpressed == 1 then | |
| self.sprite = self.sprite_pressed | |
| self.busy_hand = true | |
| else | |
| -- drop item on map | |
| sfx(2) | |
| if mget(self.posx/8, self.posy/8) == 0 then | |
| mset(self.posx/8, self.posy/8, self.grabbed_item) | |
| self.grabbed_item = 0 | |
| self.busy_hand = false | |
| end | |
| end | |
| else | |
| self.sprite = 66 | |
| self.sprite_pressed = 67 | |
| if self.btnpressed == 1 or self.busy_hand then | |
| self.sprite = self.sprite_pressed | |
| end | |
| end | |
| end | |
| function Mouse:pointer_draw() | |
| if self.busy_hand then | |
| spr(self.grabbed_item, self.mapx, self.mapy) | |
| end | |
| -- Free cursor when no action is | |
| if self.current_mode == self.modes.pointer then | |
| spr(self.sprite, self.posx, self.posy) | |
| end | |
| end | |
| function Mouse:rubber_draw() | |
| if self.current_mode == self.modes.rubber then | |
| spr(self.sprite, self.mapx, self.mapy) | |
| end | |
| end | |
| function Mouse:brush_draw() | |
| if self.current_mode == self.modes.ground then | |
| -- Draw tile cursor | |
| spr(10, self.mapx, self.mapy) | |
| end | |
| end | |
| function Mouse:update() | |
| self:update_map_position() | |
| if self.current_mode then | |
| self.current_mode(self) | |
| end | |
| end | |
| function Mouse:draw() | |
| if self.current_draw then | |
| self.current_draw(self) | |
| end | |
| end |
Apologies for the long source code of the mouse.lua, but it is actually doing all the job:
Switching logic between the different functions (brush, rubber and pointer)
Drawing tiles at the map
Erasing tiles at the map
TO-DO - Animations for the erase or draw functions. Feel free to implement your own animation system here, if you went through the code you probably saw that part.
Camera Handler Implementation - camera.lua
| Cam = {} | |
| function Cam:new(o) | |
| o = o or {} | |
| o.x = o.x or 0 | |
| o.y = o.y or 0 | |
| o.mode = o.mode or "static" -- static, follow_player, pan_to | |
| o.move_x = 2 | |
| o.move_y = 2 | |
| setmetatable(o, {__index = self}) | |
| return o | |
| end | |
| function Cam:update() | |
| if self.mode == "static" then | |
| if btn(1) then | |
| self.x += self.move_x | |
| end | |
| if btn(0) then | |
| self.x -= self.move_x | |
| end | |
| end | |
| end | |
| function Cam:draw() | |
| if self.mode == "static" then | |
| -- Draw camera rectangle | |
| camera(self.x,self.y) | |
| local right_arrow = spr(104, self.x + SCREEN_WIDTH -7, self.y + SCREEN_HEIGHT / 2,1,1,false,false) | |
| local left_arrow = spr(104, self.x, self.y + SCREEN_HEIGHT / 2,1,1,true,false) | |
| end | |
| end |
Connect all the pieces together
So, once again, we created new components to be used at our game mouse.lua and camera.lua now it is time to create the instance of our objects at the main.lua file and make sure everything is working as expected
| function _init() | |
| -- Enable mouse support | |
| poke(0x5f2d,1) | |
| -- GLOBAL VARIABLES | |
| SCREEN_WIDTH = 128 | |
| SCREEN_HEIGHT = 128 | |
| MAP_WIDTH = 1024 | |
| MAP_HEIGHT = 256 | |
| TILE_STANDARD_SIZE = 8 | |
| -- Creating the list of icons | |
| icons = {} | |
| -- Initialice our icons that will be part of the toolbar | |
| pointer = Icon:new({name="Pointer",posx=106,posy=0,sprite=84, | |
| sprite_pressed=100,active_sprite=116,type="Pointer"}) | |
| ground = Icon:new({name="Ground",posx=116,posy=0,sprite=85, | |
| sprite_pressed=101,active_sprite=117,type="Ground"}) | |
| rubber = Icon:new({name="Rubber",posx=106,posy=0,sprite=83, | |
| sprite_pressed=99,active_sprite=115,type="Rubber"}) | |
| -- Adding icons to the global icons list | |
| add(icons,pointer) | |
| add(icons,ground) | |
| add(icons,rubber) | |
| -- Create instance of UI, Mouse and Camera handlers | |
| toolbar = Toolbar:new({posx=SCREEN_WIDTH/2-16,posy=12,sizex=40,sizey=15,round=1,icons=icons}) | |
| mouse = Mouse:new() | |
| mouse:init() | |
| cam = Cam:new() | |
| end | |
| function _update60() | |
| -- Future functionality | |
| toolbar:update() | |
| mouse:update() | |
| cam:update() | |
| end | |
| function _draw() | |
| cls() | |
| -- Draw map | |
| map(0, 0, 0, 0, 128, 32) | |
| cam:draw() | |
| toolbar:draw() | |
| mouse:draw() | |
| end |
Remember that you also need to edit your p8 file in order to add the new includes.
I talk more about this way of working with PICO-8 at our previous article
pico-8 cartridge // http://www.pico-8.com
version 43
__lua__
#include main.lua
#include ui-components.lua
#include mouse.lua
#include camera.lua
[more code...]Today we created an environment where we are able to draw and erase tiles on pico-8 map space, not only that but we also implemented the cam() function to be able to create a wide 2D World on our Super Pico Maker map.
My previous calculations were right and we just used ~2000 tokens to create the interactive UI for level building, yay!
This is just the first step to get closer to our Super Mario Maker inspiration.
What’s next?
During our next workshop for January 2026, we are going to implement gravity and collision detection, if you are already excited and you want to read about the topic, there is an article for it:
Yes, I wanted to make the boundaries visible for my prototype, much easier to debug and understand if the system is working 😁
Thank you for reading!


